Missouri Geological Survey Director: Carey Bridges, RG
This fact sheet provides guidance to well owners about how to disinfect a domestic water well and distribution system. Disinfection is needed when a water sample tests positive for bacteria, the well has been impacted by floodwater, or when work on the well (e.g., a pump replacement or liner installation) has been completed. It is important to note that chlorinating a well multiple times a year causes corrosion of the casing. This can lead to pumps falling into the well and wellheads being replaced.
Before you begin
We recommend using a licensed well contractor to perform the disinfection procedure. However, if you must perform the procedure yourself please use the following instructions and read all cautions before proceeding.
Be careful when handling chlorine solutions. Wear rubber gloves, goggles and a protective apron. If chlorine accidentally gets on your skin, flush immediately with clean water.
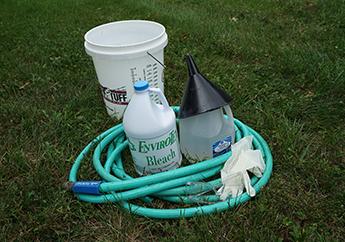
Items needed to chlorinate your well
- A garden hose, long enough to reach from a water faucet to the well.
- Clean bucket, filled half to three-quarters full with water.
- Protective equipment (goggles and rubber gloves).
- 2-5 gallons of bottled water.
- Unscented bleach, preferably unopened and less than 6 months old.
- Chlorine test papers (optional).
- Funnel (optional for wells with caps, necessary for well seals).
STEP 1 – Turn off the electricity to the well.
For safety reasons, turn OFF the electrical power to the pump.
STEP 2 – Bypass all water treatment systems.
Turn or push the bypass valves to “bypass” or “out of service” position for all water treatment systems (water softeners, reverse osmosis systems, etc.) and any appliances that cannot tolerate bleach. These appliances may either be damaged by bleach or may remove the bleach before entering your home.
STEP 3 – Open the well.
The style of the well covering dictates how to open the well. If you have a well cap, remove the cap and move the wires with connector caps to the outside so they don’t get wet in later steps. If you have well seal with a vent, remove the vent but do not remove the compression bolts for the well seal. If you have a different type of covering, contact a well contractor who holds a permit to do business in Missouri. Call 573-368-2165 for assistance.
STEP 4 – Inspection.
Inspect the well for any potential problems to eliminate defects so contamination cannot enter the well. Examine the following:
- Wire insulation for cracking, peeling or missing wire nuts.
- Well casing for cracks.
- Loose well caps.
If you observe spiders, spider webs or insects, this is an indication your well cap is loose and should be replaced.
STEP 5 – Mixing the bleach solution.
The size of your system and the amount of water in your well will influence the amount of bleach needed to disinfect the well. Very few wells will need more than one gallon of bleach. Using more bleach than necessary will not disinfect the water faster, may cause corrosion of the steel casing and will hinder the disinfection effectiveness.
To calculate the amount of bleach needed, you need to know the well’s depth and static water level. Subtract the water level from the total depth to determine the amount of water in the well. If you do not know this information, using one gallon of bleach is sufficient.
Use the amount of bleach as indicated in the table below.
|
Amount of Water in Well |
Well Casing Diameter |
||
|---|---|---|---|
|
|
6" |
8" |
10" |
|
50' |
3 cups |
3.2 cups |
4 cups |
|
100' |
4 cups (1 quart, ¼ gallon) |
6.5 cups |
8 cups |
|
200' |
8 cups (2 quarts, ½ gallon) |
12.8 cups |
1 gallon |
|
300' |
12 cups (3 quarts, ¾ gallon) |
1.2 gallons |
1.5 gallons |
Slowly add the bleach to the clean 5-gallon bucket containing 2-3 gallons of water.
STEP 6 – Pour the bleach solution into the well.
If you have a funnel, use it to place the bleach solution in the well. If your well has a well seal, you need to use a funnel. Place the funnel in the hole where the air vent was located on the well seal. Pour the bleach solution into the well. Avoid the well casing as much as possible as the bleach will cause corrosion of steel casing.
**Caution: Bleach added to water with a pH below 5.0 will release chlorine gas which is toxic. This procedure should be done in a well-ventilated area.
Do not pour bleach directly on electrical connections or the pitless adapter (if applicable) as this can cause damage to these components.
STEP 7 – Recirculate the chlorinated water in the well.
- This step is important to make certain the entire water column in the well is chlorinated, not just the upper portion. Turn on the power to the well, but be careful. The wires are now “live and hot.”
- Connect a hose to a faucet outside and run the water for about 10 minutes in an area away from the well, septic system, landscaping and bodies of water. The water may be discolored. Run the water until it clears.
- Turn off the water and place the garden hose in the well. If your well has a well seal, you need to use a funnel. Place the funnel in the hole where the air vent was located on the well seal. Turn on the water for at least 30 minutes. If you have chlorine strips, use them to determine whether the water has at least 50 ppm. If the tests do not show a minimum of 50 ppm or you cannot smell any bleach, go repeat Step 5.
- After 30 minutes, turn off the water and the power to the pump.
- Rinse the well components with the bottled water. This rinses off the chlorine to prevent corrosion.
- Replace the wires and well cap and turn on the power to the pump.
STEP 8 – Draw the bleach solution into the house plumbing and fixtures.
Go to the faucet and remove the aerator, if present, to prevent it from getting clogged with loosened scale or lime. Run both hot and cold water until you smell bleach or when your chlorine test papers show 50 ppm. If you do not smell bleach or the strip tests below 50 ppm, repeat Steps 5 through 8. Turn off the faucet when you smell the bleach or the test strips shows chlorine levels are at or above 50 ppm.
Repeat this for every faucet, including showers and outdoor faucets, and flush the toilets.
STEP 9 – Disinfection time.
Let the bleach solution sit in the pipes for at least 8 hours or overnight, if possible. Do NOT let it sit for longer than 16 hours. Chlorine is corrosive and can cause pipes to leak or burst.
STEP 10 – Remove the bleach solution
Using a hose connected to an outdoor faucet, run the water in an area away from the well, septic system, landscaping and bodies of water to flush the bleach solution from the well. This may take several hours to complete. Once you no longer smell bleach or the chlorine test strips test negative, turn off the water. Drain the hot water tank(s), then run the hot and cold water faucets until you no longer smell bleach or the chlorine test strips test negative.
Repeat this for every faucet, including showers, and flush the toilets.
STEP 11 – Disinfect water treatment systems and appliances.
Follow the manufacturer’s instructions to disinfect any water treatment systems and appliances bypassed in Step 1. If you are unable to find disinfection instructions, contact a water treatment or appliance service provider. Bleach may damage the system or appliance and if not disinfected, you may reintroduce contamination.
STEP 12 – Reconnect water treatment systems and appliances.
Return bypass valves to the ON position after disinfecting the appliances and water treatment devices.
STEP 13 – Follow-up.
- To be sure the disinfection process is successful, a follow-up water sample is necessary. Bacteriological sample kits are available at county health departments. Wait 5-10 days after disinfection to collect the sample. Waiting allows any residual chlorine to be flushed from the water system. If the sample is positive for total coliform, repeat the disinfection process. Do not be alarmed if multiple disinfections are needed to clean a water system as sometimes the bacteria have been growing for a period of time and require several disinfections.
- If the samples are positive for E. coli after disinfection, a more serious problem may exist. The well may have a construction issue or defect that would require the services of a well contractor that holds a permit to do business in Missouri. Call 573-368-2165 for assistance or locate contractors licensed to do business in Missouri using the Well Information Management System tool.
"Well Disinfection" adapted with permission from Minnesota Department of Health.
Nothing in this document may be used to implement any enforcement action or levy any penalty unless promulgated by rule under chapter 536 or authorized by statute.
For more information
Well Installation Section
Missouri Geological Survey
P.O. Box 250
Rolla, MO 65402-0250
United States