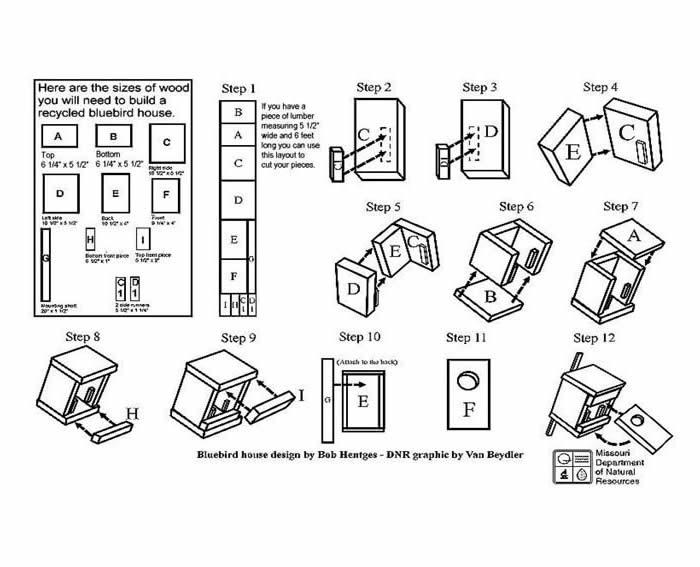
Find enough scrap lumber to equal one piece of lumber one inch thick, 5½ inches wide and 6 feet long. Do not use plywood or particle board as the glue in most of them will dissolve in the rain.
- Step 1 - Cut the lumber as shown in the Step 1 graphic. The design allows for the cut of the saw blade.
- Step 2 - Nail a side runner, using #3 nails, on the right side so it is 2” from the bottom side piece and ¾” from the front of the piece. This will leave it about 6” from the top of the piece.
- Step 3 - Repeat Step 2 for the left side.
- Step 4 - Align the right side on the back piece, making sure the side runner board is facing the front and toward the inside of the box. Use #6 nails to fasten.
- Step 5 - Attach the left side to the back, as in Step 4. Make sure the side runner is facing toward the inside of the box.
- Step 6 - Attach the bottom of the box to the sides and back. Leave the ¾” extra facing out the front of the box. Use #6 nails.
- Step 7 - Attach the top, as per Step 6.
- Step 8 - Nail the bottom front piece so it touches both sides and the bottom of the box. Use #6 nails.
- Step 9 - Nail the top front piece to the top, as per Step 8.
- Step 10 - Nail the mounting shaft down the centerline of the back of the box so about half of the excess (about 5 ½”) sticks out above and below the box. Use #6 nails. The shaft can be mounted on the side, if you have a place picked out for the box and want the front to face a certain direction.
- Step 11 - Cut a hole 1 ½” in diameter out of the front. The center of the hole should be 2 ¾” from the top, in the middle of the board.
- Step 12 - Slip the front board into the box opening at a slight inward angle. The board should slide in and then slip down behind the front top and bottom pieces. (I and H.) The two front pieces should then securely hold the front in place. It may be necessary to allow it to slip into the opening. Removal is a simple reversal of the process, to allow easy access for cleaning. Never put a perch on the front of a bluebird box.

