Division of Environmental Quality Director: Art Goodin
With this system, compost piles are “turned” in order to aerate them, mix the materials and achieve quick decomposition. First, store wastes until enough are available to fill one of the three bin compartments, then chop, moisten and layer the materials to ensure a hot compost. Turn the piles weekly for aeration and to expose new surfaces to the decomposition microbes. A pile made with a balance of fresh greens and wood materials and turned weekly can be ready in as little as three weeks. The texture of the finished compost depends on the materials composted. This unit can be built for approximately $130. Construction requires basic carpentry skills and tools.
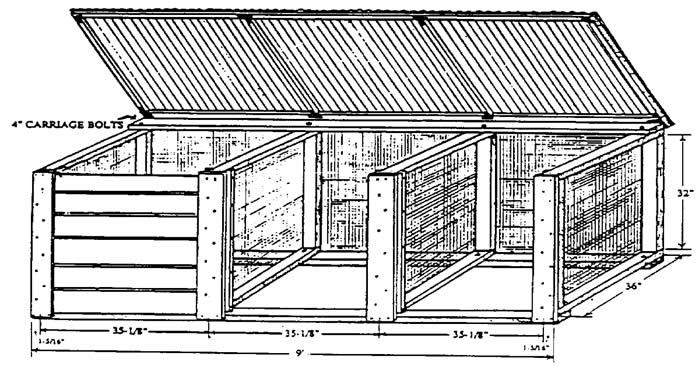
Construction Details
Build Dividers:
Cut two 31-inch pieces from a 12-foot 2x4. Butt-end nail the four pieces into a 35-inch by 36-inch square. Repeat for the other three sections. Cut four 37-inch long sections of hardware cloth, bending back edges one inch for strength. Stretch hardware cloth across each frame, checking for squareness of the frame and staple screen tightly in place every four inches.
Set Up Dividers:
Set up dividers parallel to one another three feet apart. Measure and mark centers on the two inside dividers. Cut the 18-foot 2x4 boards into four nine foot pieces. Place two nine foot base boards on top of dividers and measure the positions for the two inside dividers. Mark a center line for each divider on the nine foot 2x4. With each divider, line up the center lines and make the base board flush against the outer edge of the divider. Drill a one-half inch hole through each junction centered one inch from the inside edge. Secure base boards with carriage bolts, but do not tighten yet. Turn the unit right side up and repeat the process for the top nine foot board. Using the carpenter’s square, or measuring between opposing corners, make sure the bin is square, and tighten all bolts securely. Fasten a nine foot-long piece of hardware cloth securely to the back side of the bin with staples every four inches.
Front Slats and Runners:
Cut four 36-inch long 2x6s for front slat runners. Rip cut two of these boards to four and three-quarters inches wide and nail them securely to the front of the outside dividers and baseboard, making them flush on top and outside edges. Save remainder of rip cut boards for use as back runners. Center the remaining full-width boards on the front of the inside dividers, flush with the top edge and nail securely. To create back runners, cut the remaining 2x6 into a 34-inch long piece, then rip cut into four equal pieces. Nail back runner parallel to front runners on side of divider, leaving a one inch gap for slats. Cut all of the 1x6 cedar boards into slats 31 1/4-inches long.
Fiberglass Lid:
Use the last nine foot 2x4 for the back of the lid. Cut four 32 ½-inch 2x2s and one nine foot 2x2. Position in place on ground (following illustration on other side of these instructions) and frame, brace side down, on bin structure and attach with hinges. Cut wiggle board to fit the front and back nine foot sections on the lid frame. Pre-drill wiggle board with 1/8-inch drill bit and nail with 8d casement nails. Cut fiberglass to fit flush with front and back edges. Overlap fiberglass pieces at least one channel wide. Pre-drill fiberglass and wiggle board for each nail hole. Nail on top of every third hump with gasketed nails.
Materials:
- 2 18' treated 2x4s
- 4 12', or eight 6' treated 2x4s
- 1 9' 2x2, and two 6' 2x2s
- 1 16' cedar 2x6
- 9 6' cedar 1x6s
- 22 ft. of 36" wide ½” hardware cloth
- 12 ½” carriage bolts 4" long
- 12 Washers and nuts for bolts
- 3 lbs. 16d galvanized nails
- ½ lb. 8d galvanized casement nails
- 250 poultry wire staples or power stapler with 1" staples
- 3 8' lengths of wiggle molding
- 1 12' sheet and one 8' sheet 4 oz. clear corrugated fiberglass
- 40 gasketed aluminum nails for corrugated fiberglass roofing
- 2 3" zinc plated hinges for lid
- 8 Flat 4" corner braces with screws
- 4 Flat 3" T-braces with screws
Tools Required:
Hand saw or circular power saw, drill with ½” and 1/8" bits, screwdriver, hammer, tin snips, tape measure, pencil, 3/4" socket or open-ended wrench, carpenter’s square. (Optional: power stapler with 1" long galvanized staples.)
Remember to use eye and ear protection.
Construction plans courtesy of the Washington State Energy Extension Office, Seattle, WA.
The Master Composter Program is sponsored by the Missouri Botanical Garden’s Center for Home Gardening with the generous support of the Monsanto Fund. Compost Hotline: 314-577-9555.
Nothing in this document may be used to implement any enforcement action or levy any penalty unless promulgated by rule under chapter 536 or authorized by statute.
For more information
Waste Management Program
Division of Environmental Quality
P.O. Box 176
Jefferson City, MO 65102-0176
United States