Dam and Reservoir Safety Program fact sheet
Missouri Geological Survey Director: Carey Bridges, RG
Missouri Geological Survey Director: Carey Bridges, RG
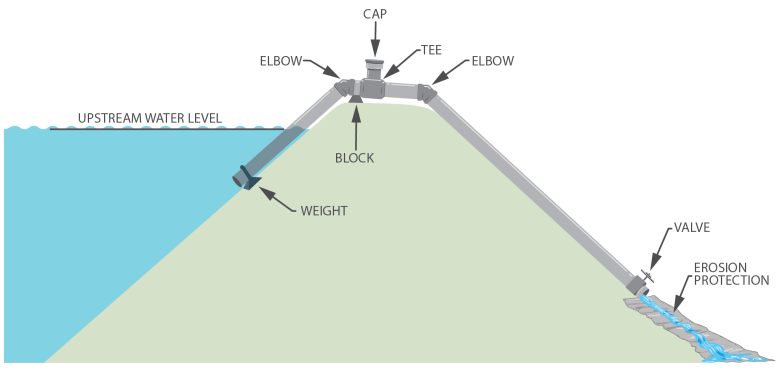
- The location for installing the siphon is very important. Place the siphon where the discharge will not create erosion that could affect the integrity of the dam and the lift needed is at a minimum.
- Use rigid PVC.
- Solvent weld all joints to ensure the seal is watertight and airtight.
- The siphon pipe must extend into the lake to approximately 3 feet below the desired drawdown depth (as the water level nears the pipe entrance, elevation vortices will form and the siphon will fail).
- Use two 22 1/2-degree elbows to align the siphon pipe to the ground surface on either side of the crest of dam.
- Install a cap or valve at the downstream end of the system.
- A tee section at the crest of dam must include a cap for filling the system.
- In most cases a weight should be added on the upstream end to ensure the piping remains submerged at the desired depth.
- Provide erosion protection at the discharge end of the siphon.
- Close the lower valve, open tee cap and fill the siphon. When full, close and seal the top cap and open the lower valve.
- Once installed, the tee cap may require additional sealing such as pipe joint compound, duct, tape, or a plastic bag installed over the cap.
- Add multiple siphons to achieve no more than 6 inches per day of draw down.
- The maximum lift attained with a siphon, with lift being defined as the vertical difference between the high point on the siphon and the upstream water level, is approximately 25 feet vertical.
For additional inquiry regarding installation and operation of a siphon on a dam please contact the department’s Dam and Reservoir Safety Program.

Nothing in this document may be used to implement any enforcement action or levy any penalty unless promulgated by rule under chapter 536 or authorized by statute.
For more information
Dam and Reservoir Safety Program
Address
Missouri Geological Survey
P.O. Box 250
Rolla, MO 65402-0250
United States
Email
